
One of the things we love most about crafting is learning new skills and creating something completely by hand. That’s why we’re so excited to share that La Belle Cove Crafts has officially started its pottery journey!
For quite a while, we’ve been dreaming about adding handmade pottery pieces to our collection. After lots of research, planning, and watching way too many pottery videos, we finally took the first step.
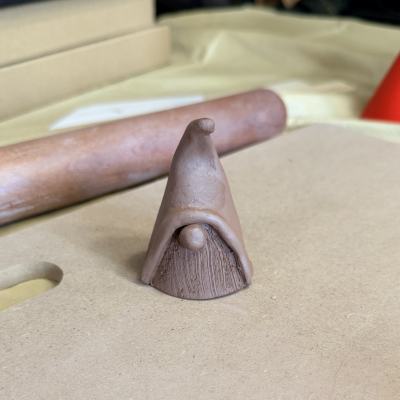
Step 1: Clay, Tools, and Gnomes
Every new adventure starts somewhere, and ours started with clay and a few basic tools.
We gathered everything we needed and jumped right in with our very first hand-built pottery project: adorable gnome ornaments! There was definitely a learning curve, but seeing those little gnomes take shape in our hands was incredibly rewarding.
Step 1 is officially complete on our side!
**STAY TUNED FOR PART 2 AS WE FINISH MORE OF THE PROJECT.
If you are looking to try this yourself, here are some helpful links. As an Amazon Associate we earn from qualifying purchases. This is at no extra cost to you!
The clay we are starting with for our first project (paid link) https://amzn.to/4u9KORW
The tools we started with (paid links) https://amzn.to/3RMebwb
Step 2: Preparing for the Fire
Now comes the exciting part.
Because we’re starting small, we’ve chosen to use microwave kilns rather than investing in a full-sized pottery kiln right away. To prepare for our first firing, we’re currently gathering the remaining equipment:
- Microwave kiln
- High heat-resistant mat (paid link) https://amzn.to/4uWPj3x
- Long tongs for safely removing the kiln from the microwave
- High heat-resistant gloves
We’re currently in the middle of this stage and eagerly waiting for everything to arrive.
Step 2 is in progress on our side!
Step 3: The First Firing
Once all of our equipment is ready, it will be time for the moment of truth: firing our gnome ornaments for the very first time.
This process transforms the clay from a fragile handmade piece into durable ceramic. We’ll be sharing photos and updates as we go on social media (so FOLLOW US on all social !!!) and in future blogs, because honestly, we’re just as curious as you are to see how our first batch turns out!
Step 4: Adding Color with Glaze
After the first firing, the real fun begins.
We’ll choose glazes and carefully paint each ornament by hand. This is where the personalities of our little gnomes will really come to life, with colors, details, and plenty of charm.
Step 5: The Final Fire
The final step will be firing the ornaments a second time.
This firing melts and seals the glaze, creating the finished look and giving each ornament its beautiful shine and durability. At that point, our very first pottery creations will officially be complete!
Come Along for the Journey
One of the goals of La Belle Cove Crafts has always been to share the creative process, not just the finished products. That means you’ll get to see the successes, the mistakes, the lessons learned, and hopefully some beautiful handmade pieces along the way.
We’re excited, a little nervous, and ready to learn.
Stay tuned as we continue our pottery adventure and bring our first handmade gnome ornaments to life!
Have you ever tried pottery? We’d love to hear about your experience in the comments.
As an Amazon Associate we earn from qualifying purchases. This is at no extra cost to you!